Reflecting part 5: make a shape and pull a face! #magicmoments #whatsthestory #mamarazzi

I am continuing my series of looking at some of my images from last year and sharing some of my thoughts and the settings i have used. Last week i was talking about learning and how, i believe, that is the greatest investment you can make in your photography arsenal!

One of those things that we all say is how much we love natural shots, those candid captures that really bring out the personality of our subjects. Its something that we all strive to do as we tell the stories of our lives. Sometimes its not always the easiest to do. The light may be poor, the environment might not be right or you might just have not got to that shutter quick enough! 😉

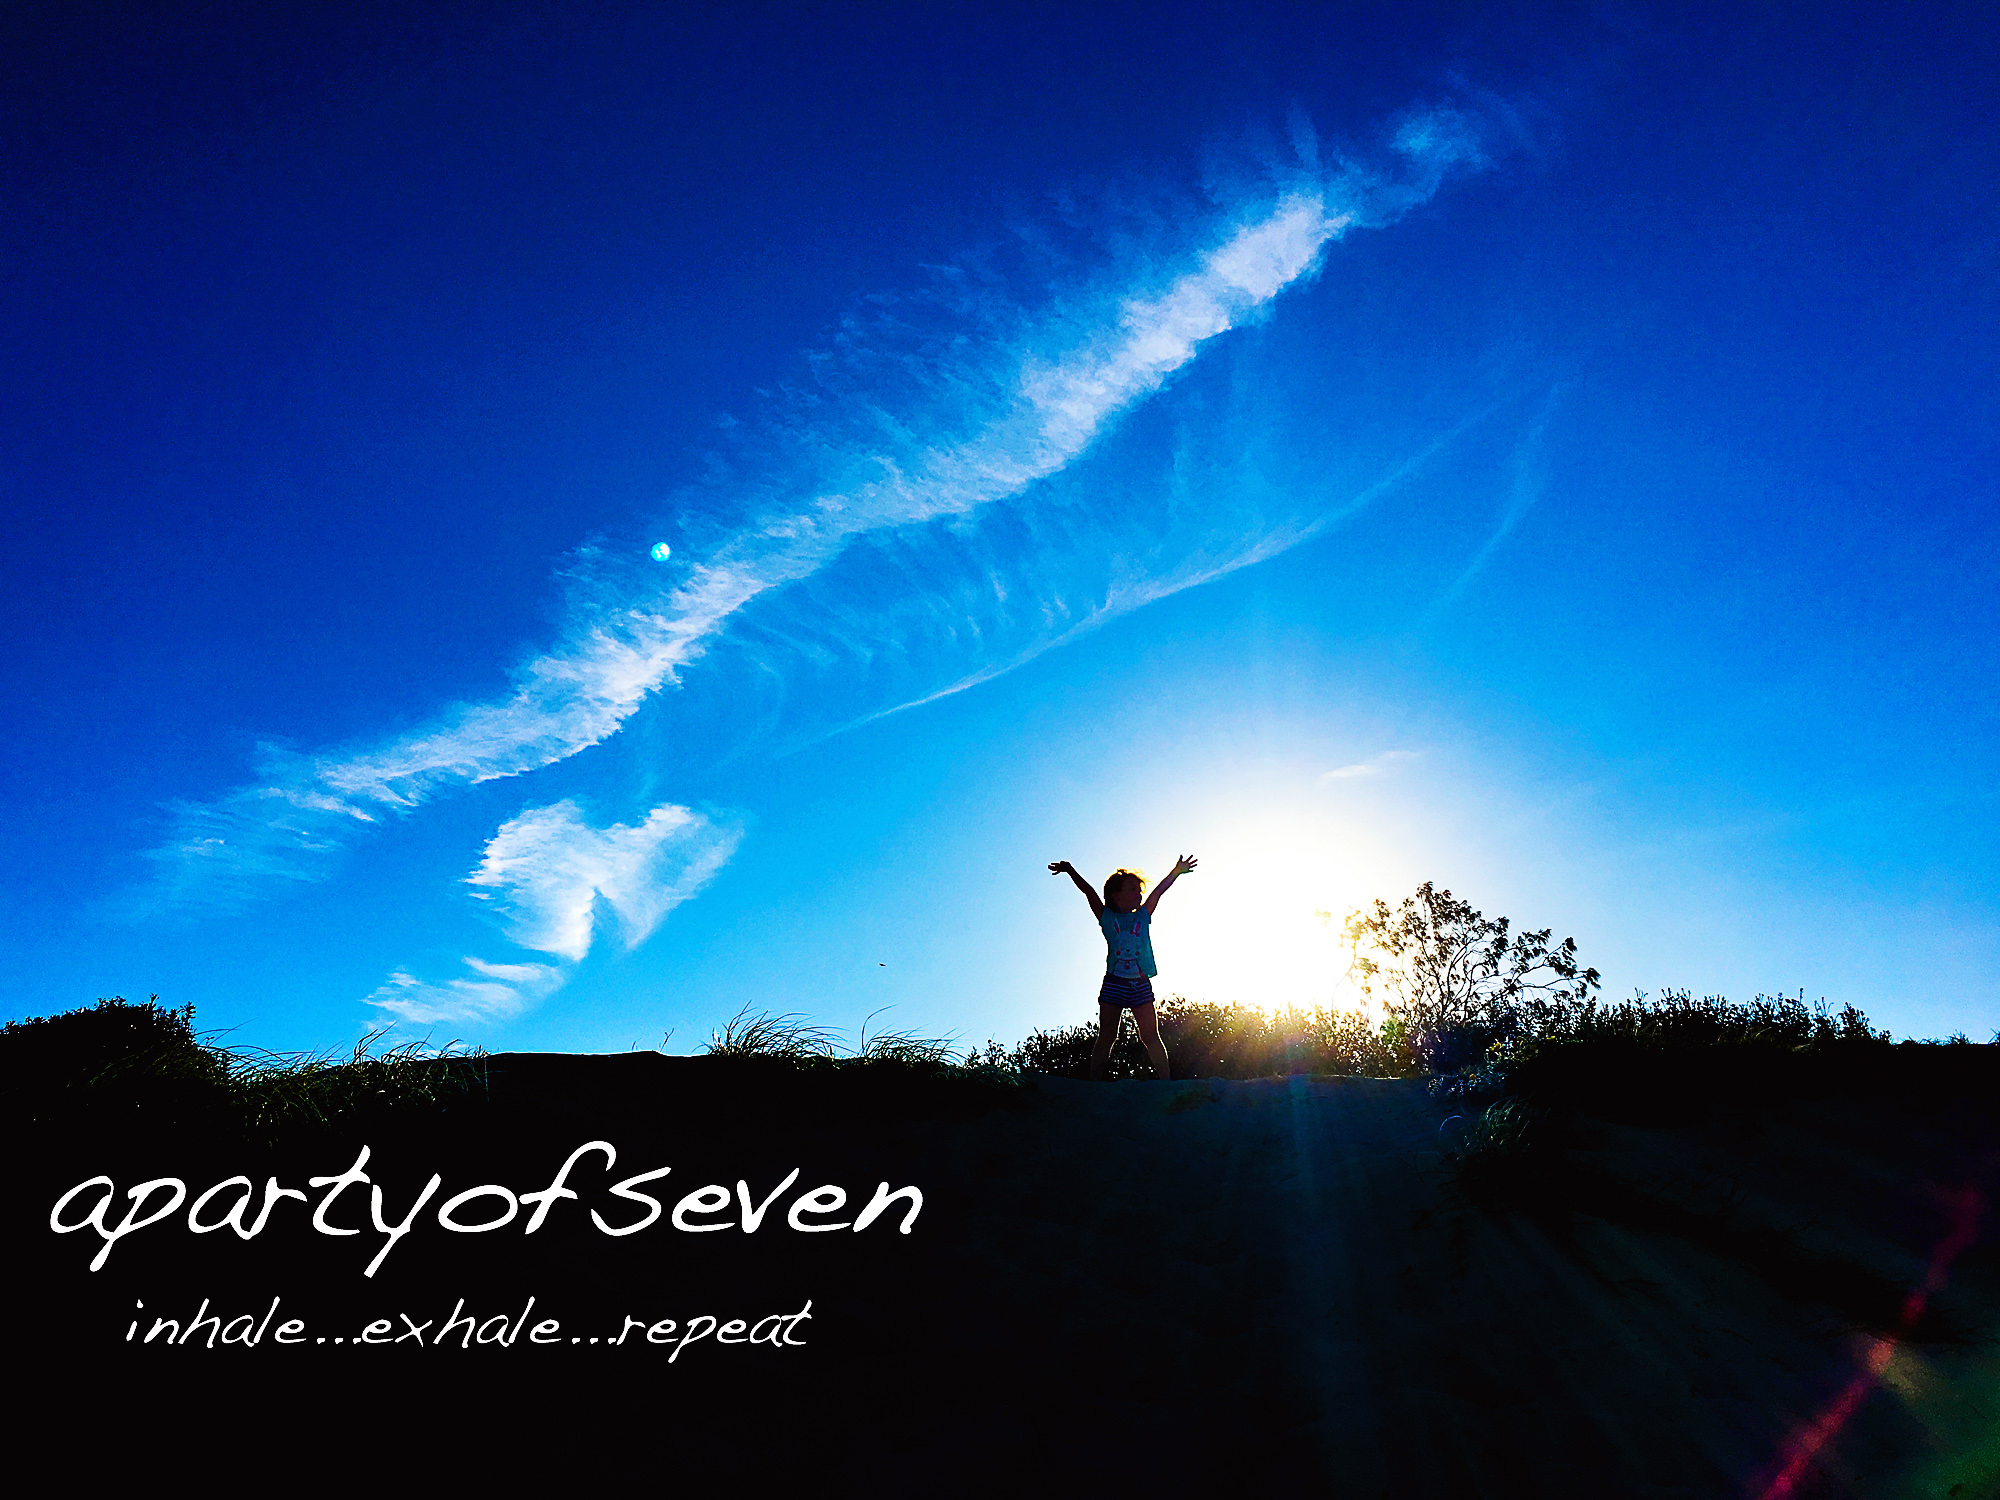
One of those images that people love is the everyone jumping in the air type shots. We have all seen them, they are a favourite wedding shot or portrait session shot of the family. Its something everyone can have a go at and when you have a couple of wriggly kids it is a great distraction and they all love getting involved.

From a photographers point of view that type of shot is actually quite hard to do well. I like doing the shot because the kids love it but it isnt an easy shot for me to do well and be happy enough with it. Its often a shot that i would ask a family with older kids to do as they can actually jump away from something..rather than fall, which is what a lot of toddlers will look like they are doing. But if we are getting nowhere with some little ones then this type of shot can certainly bring them back into the spirit of it!

Its a hard shot to do outside of a studio setting. When you can control the lights and use strobe lights and have a fast shutter and lower aperture then you can get a sharp image and freeze movement. Outside you are limited to using settings that are appropriate for the lighting you have been afforded and so you might not be able to have a fast enough shutter in order to give you that low aperture (big number) so that your depth of field can work for you and more is in focus!

I mentioned this type of shot to another photography hero of mine who i spent a workshop day with and his advice was don’t do it unless asked!! 😉

So here are a few of my thoughts on how i go about getting these shots.

1. As i mentioned it is a great shot to get the kids back on side. They love to do it, all kids love to jump and they love the fact that they might be caught in action. It is the one shot that always gets them rushing to see a preview back on the screen.

2. One thing i always make sure that i explain to the kids is that they have to listen to me and only jump when i say so. I usually count them down 1.2.3.jump!

3. I always tell them to make a shape. usually arms out to the side, legs out..or something…if they just jump then if you capture that moment it will just look like they are falling. Doesn’t give much of a feeling of movement. So…make a shape!

4. Look Ahead! its natural for all kids to look down to where they are falling. That is going to get you a shot of the top of their heads. So i always say look at me and pull a face!! We go for make a shape and pull a face! It usually works!

5. You need a low or narrower aperture (thats a high number) or F stop. I would usually aim for F8 so that i can try my very best to get most of the family in focus. A family is made up of lots of different heights so if you are asking them all to jump up in the air, focusing each person well is hard. A wide aperture (low number) may give you one person’s face in focus but everyone else will be soft.

6. You need a fast shutter speed. You want to freeze movement right? Generally i would shoot at above 1/250 to capture the movement.

7. Aim to try it in good lighting…bright daylight conditions. Then you won’t have to massively increase your ISO to cope with the aperture etc that you are needing for your camera.

8. Hold hands! This is a really good one if you have little kids, will help to get everyone going ‘up” at the same time.

9. Put your subject on a little hill or step and ask them to jump off that rather than jump UP in the air from a flat surface. It’s easier and not so much effort for a little one.

10. Set your camera’s focus to a single point. On a lot of cameras it will give you lots of AF points. You can set your camera to only pick the one you choose. If you leave it to select it, it will be jumping around all over the place trying to focus on the different subjects. Use it to help you get folks in focus. Select one ( i usually go for middle) and then you can always re-compose your shot if need be.

I never really tire of this shot. Even though, in reality, most clients are not going to choose it for their wall. But i do love the joy that it brings out in the kids and the kid its brings out in the adults!! 🙂

Here are some of my favourite ones…

the ordinary momentsMotivational Mondayliving arrows

Follow:

learning..learning..learning. Reflection part 4. #whatsthestory #magicmoments #mamarrazi

When you take a lot of photographs..you look at a LOT of photographs and not just your own. I am always checking out imagery, lighting and maybe the odd bit of PS awesomeness in lots of other folk’s work. Other photographers work can be so inspiring to look at and try and work out what they have done, how they have made it work. Always studying, always learning…

One of the things i get asked a lot is ‘how do i improve my photography?’

and no..my answer is never get a better camera. Well not initially anyway. I will always answer..get some training or education. Learn about light, what makes an image capture the eye and how you can go about using your camera to allow you to put on to film what is in your mind’s eye.

I have done a few bits of training with some incredible professionals and it was better for my photography than ANY bit of equipment that i have ever purchased..and i really really mean that! What you can learn, particularly on a hands on course, will teach you far more than shelling out the price of a small car to buy another fancy pants lens.

In 2013 i did a one day semi-private course with one of my photography heros. It was a day looking at natural light photography and a bit of flash based around a bride. Yeah..not exactly what i choose to shoot. BUT it was incredible. Those AH HA moments came thick and fast. I was desperately trying to remember everything and take it all in. They did not discuss kids, newborns or anything like what i photograph day to day..but what i learnt there has stayed with me and it can all be transferred to almost every type of setting. The basics of good photography don’t change. Its just your subjects that do.

It was a lot of fun actually photographing a bride and thinking about how you can get amazing poses and shots for adults who take direction. It is inspiring to be with other photographers too and share ideas and get help!!

Some of the things we chatted about were using reflectors effectively: I havent put any of these images through post processing, other than a little sharpen. Just want to show what i learnt and the difference it makes when you actually know how to use that very clever little black box you have in your hand 🙂

Then we chatted a little bit about Kelvin…(thats not a person!) its how temperature is measured. Whats this got to do with photography i hear you cry? Well light is measured on a Kelvin Scale. It is fairly straightforward on most DSLR’s you can change your white balance and on some DLSR you will be able to dial in the kelvin range of the light you are shooting in so that you camera can better assist you in getting the light right.

Make sense? Nope? Okay maybe this table will help.


To demonstrate with the images of the bride. Here is a shot where we dialled Kelvin right up to 7900K. So what we have here is that the camera is then thinking that the light is really really cool, on the blue end of the scale and so it compensates by throwing in some warm tones..which we probably didnt need in the setting we were in because it was already warm ish but just to see what it was like we gave it a go. This would be similar to selecting the ‘cloudy’ setting on your white balance.

Then we dialled it back to 2950K – way down to the yellow/orange sun maybe even warm lightbulb oranges..see the difference?

The camera is now trying to take down the orange tones that we are telling the camera is there. So the outcome is this blue ish tone. This would be similar to the tungsten light setting on your white balance.  The colour difference is amazing. She did have a little off camera light on her in the second one.(which is what is lighting her face) .but you can see the idea…:)

We played around with using a small hand held light..and the dramatic effects it can make in darker locations. More on this sort of lighting another time!!

But one of my favourite images from the day was this one shooting through a hazy filter..which gave such a lovely dreamy effect on the bride. I love that what looks like a moment of quiet contemplation is captured, like we may have just caught her as she is pausing to reflect, before the big day, after maybe, as she is praying, thinking, dreaming. Its a window to the soul (even though it was pretend as she was a model). It could easily be one of those sort of moments and the hazy, pinky filter that we used in front of the lens just adds so much to it.

One of my favourite days of photography and it was for pure enjoyment and learning. It is good to push ourselves outside of our comfort zone and have a go at other genres of photography. Why not try something yourself? street photography? landscapes? nature? It helps you to ‘see’ things differently.

It was amazing rubbing shoulders with real professionals who have been in the industry for so long and had so much knowledge to share. There is an element i guess in all industries that gets its feathers ruffled when new people come along as beginners and want to learn but I am all for it. We are all beginners at some point, we all have to learn. If you have found it out the hard way doesn’t mean that everyone has to go the same route.

Its good to share! 🙂

the ordinary momentsMotivational Mondayliving arrows

Follow:

Reflection part 3: how do they do that? #whatsthestory #magicmoments #mamarrazi

Continuing my series of looking at some of my favourite images from last year. You can see my last two posts here and here. 

I do a lot of newborn baby sessions. They are one of my favourites. I always say ‘babies are my business!’ 🙂

Having worked with newborn and premature babies for all of my professional nursing career it seemed like a natural extension when it came to photography! 2013 was a good year for newborns for me, I got some really well behaved, good sleepers and settled little clients and managed to get some lovely shots that i am really proud of and that i hope the parents love to! 🙂 I have written some another post about newborns here

One shot I did last year that I was really keen to try. I had seen another photographer talk about it and had waited until i had a really good sleepy baby and a game Dad to give it a try.

I have had lots of people ask me how i did it and of course with images now there can be a lot of ‘magic’ behind them whether thats just a little smoothing of the skin or large photoshopped edits. A lot of photographers will keep their cards pretty close to their chests! But I was keen to say how i actually did this shot because i want to emphasise how i did it from the point of view of baby safety.

Which is the most important thing for any photographer to consider…

Firstly i got Dad to have a go at his part of the shot. He is in front of a black backdrop and is leaning over a large beanbag which is covered in a large black blanket. Dad is actually kneeling on a bunch of towelling nappies that i use for mop ups! So that his knees didn’t ache too much. I shot a couple of images of this pose making sure his arms (he had very long arms!) were entirely on the background.


Then we got dad to strip!! and put their wee little girl who was completely asleep (they really need to be totally asleep) onto dad’s back. She was on a little rolled up towel but on reflection she was fine on her dad’s back and i was a little concerned about her being cold or uncomfortable but skin to skin is the warmest place for a baby to be….tsk tsk SCBU nurse! 😉

Then and this is the really important bit. Mum was right next to baby. You can see where mum was standing and how she had her hands on the baby’s back. Baby was in no way at any danger of falling. It’s really important to remember that babies can move their limbs very suddenly when they are asleep. We have all seen those moro reflex moves. ‘Monkey falling of a branch’ we used to call them and those sort of movements are totally involuntary and a newborn baby can do them anytime. So having a ‘spotter’ is not only important it is essential and it gives me chills the idea of working without one. You don’t need an assistant you just need mum or dad close by.

I asked mum to take her hand away from the baby’s back by a matter of inches for the seconds in which i fired the shot. That gives me distance between the two..which as anyone who has worked in photoshop knows,  makes editing SO much easier. Taking of the shot was seconds…setting it up took a LOT longer 😉

After the shoot, what i then did in photoshop (and i won’t go into photoshop speak, thats probably a whole other post) but remember the image at the start with dad without the baby on his back and just his arms out stretched?

Well this is what i did, i took that images and copied the part of his arm that i have circled in white. Which is the part in the shot with the baby that the mum is standing in front of.

Then i put that onto the image with the baby using layers in photoshop. That then essentially covers where mum was standing and completes Dad’s arm. Its a little more in depth than that but hopefully you get the idea. 🙂

and this was the finished shot.

The refection is put in post processing in photoshop. I had someone ask me if i had him kneeling over a mirror!! *insert scary face* and i have edited out mums hand, arms etc from just above the baby’s back…and generally prettied it up a little bit with some lovely black and white highlights here and there.

It is a lovely image and i know that the family loved it. When i put this image on facebook for their sneak peek the thing i loved most about it was that people didn’t initially see the baby or weren’t too sure what it was and had to do a double take and really study it. I love that it got that reaction and that people had to look deeper into it.

From a more mushy mummy level i love that demonstrates a little that bond that a Daddy has for his baby.

Almost like he cannot move until she wakes…

🙂


the ordinary momentsMotivational Mondayliving arrows

Follow:

#silentsunday

TheBoyandMe's 365 LinkyWeekly Top Shot #94

Follow:

Sefton park Palm House #countrykids


I may have written about this before. But we have this beautiful victorian palm house near us. It is a favourite visit and has such a lovely history. I think one of the reasons that it has such a lovely feeling is that there is a lot of love gone into this building. It is a grade 2 listed building and was built back in 1896. After being bombed in the war and then re-built a little, it  fell into disrepair and by the 1980’s was closed to the public as it was deemed unsafe.

In June 1992, a public meeting was held highlighting the dereliction and calling for restoration. A petition was presented to the City Council by what had become the “Save the Palm House” campaign. A public fund raising campaign was established, with a “sponsor a pane” programme generating over £35,000. This led directly to the conversion of Save the Palm House into a registered charity (Friends of Sefton Park Palm House). The Palm House was partially repaired and reopened in 1993. It was fully restored at a cost of £3.5 million with Heritage Lottery and European funding and reopened in September 2001.

It is now simply stunning and is often used for events and weddings. It is so pretty and one of my favourite places. One of the things about the people of this city is that they love their city and they will get behind something that is important to them.

The palm house is evidence of that, that is for sure…

I have photographed it SO many different times. One of the first professional jobs i had was in the palm house, in the evening and with not much light. yeah was a baptism of fire. I climbed the little staircase that takes you up to the top of the palm house to try and get an overhead shot. There is a little gallery at the top of the dome. But the ladder started to wobble and got the best of me!! It was an evening ill not forget.

This is one of my shots from that night:

Ha! looking at those images now makes me realise how much i have changed as a photographer. I wont forget that fully grown angel statue and his hairy legs though!! 😉

We often just nip out to the park and the palm house at the end of the day and before the kids went back to school and all the christmas decorations came down we did just that and it was all pretty and lit up with fairy lights and a jaunty little christmas tree in the doorway (that was actually tied down- bit windy i guess!) It was getting very dark as we left the park and i only had my little camera with me and i fiddled with the setting so that i could let in a max amount of light to get the blue in the sky. It could really do with a tripod to be honest because the shutter was slow and really it was beyond a hand hold but they kids were already yelling at me to hurry up…they get quite used to mama dragging her feet and taking lots of shots!!

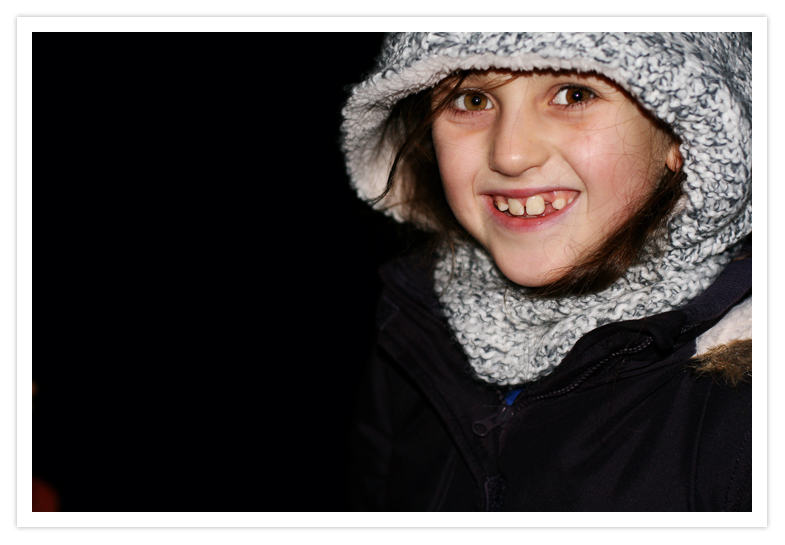
Then we played a little with some ‘fill-in’ high sync flash techniques….the kids always come back on side when they are in the pictures!! (btw for the photographers out there, this image below is just taken with a entry level DSLR and the little on camera flash that it has!!)


Family Farm Holidays Cornwall

Follow: